Paul Guy
COMM3F : NS2 Tutorial:
COMM3F
Network Simulation
(Ian Fletcher & John Tindle).
Ns2 Tutorial
Paul Guy
3rd December 2003
3. How to install ns2
3.1 Microsoft Windows Cygwin Install
One option of installing ns2 on the Microsoft Windows platform is to use Cygwin this can be used on 9x/ME/NT/2000/XP; this is a free download from http://www.cygwin.com/. So what is Cygwin;
“Cygwin is a Linux-like environment for Windows. It consists of two parts:
1. A DLL (cygwin1.dll), which acts as a Linux emulation layer providing substantial Linux API functionality.
2. A collection of tools, which provide Linux look and feel” [CYG01]
One disadvantage in using Cygwin is it downloads the packages from the Internet, so users without a Cable/DSL connection would find this could in fact take a fair amount of time.
Spaces in profile names and in the root installation directory cause chaos and can lead to a long a tedious installation. So my main point is ensure your profile if you are using one does not contain any spaces. I would recommend that you set the default installation directory to c:/cygwin. The setup.exe file can be either run directly from the web site or can be downloaded from one of the mirror sites. Once the setup.exe file has been downloaded you are ready to start installing the relevant packages to run ns2. A good site for installation help is [SIMS01]. See appendix A for installation routine and diagrams.
Ensure you left the text type as Unix during the install. Start cygwin and at the prompt type mount | grep textmode If nothing is returned you are okay, otherwise re install.
Check windows api is installed at the prompt type
cygcheck -c w32api | grep w32api
This time ensure it returns the version etc. If you receive nothing install it using cygwin before continuing.
The user guide can be found at: http://xfree86.cygwin.com/docs/ug/cygwin-xfree-ug.html
Next Download Network simulator elements for cygwin
Download ns allinone:
http://www.isi.edu/nsnam/dist/ns-allinone-2.26.tar.gz
Download new configure file. Save with a .configure extension
http://www.sims.berkeley.edu/~christin/software/nam-1.9.configure
download the patch
http://www.sims.berkeley.edu/~christin/software/ns-allinone-2.26-cygwin.patch
copy these files to your home directory in cygwin which should be something like
c:\cygwin\home\yourname
now untar ns at the cygwin command prompt type
tar xzvf ns-allinone-2.26.tar.gz
This will create a folder in your home drive called ns-allinone-2.26. Now replace the wrong configure file with the new one you downloaded
mv nam-1.9.configure ns-allinone-2.26/nam-1.9/configure
Change directory to the ns-allinone-2.26 folder
cd ns-allinone-2.26
Now lets patch the system
patch –p0 <~/ns-allinone-2.26-cygwin.patch
The system will now tell you it is patching the system. Now Install ns by typing
,/install
when complete type
pwd
This will return your present working directory make a note of this
exit cygwin and edit your .bashRC file in your home directory and add the following lines replacing the path in export NS_HOME with the value that pwd returned
export NS_HOME=/home/XXX/ns-allinone-2.26/
export PATH=$NS_HOME/tcl8.3.2/unix:$NS_HOME/tk8.3.2/unix:$NS_HOME/bin:$PATH
export LD_LIBRARY_PATH=$NS_HOME/tcl8.3.2/unix:$NS_HOME/tk8.3.2/unix:\
$NS_HOME/otcl-1.0a8:$NS_HOME/lib:$LD_LIBRARY_PATH
export TCL_LIBRARY=$NS_HOME/tcl8.3.2/library
open up cygwin again and complete the optional validation test. Note this may take some time.
cd ns-allinone-2.26
cd ns-2.26; ./validate
Once Validation is complete place your .tcl files in your home directory and then open up Cygwin and start the X86 server. At the prompt type:
Sh /usr/X11R6/bin/startxwin.sh
This will start the X86 server and open up a terminal window. In the terminal window you can now run Ns by typing at the prompt:
ns yourscriptname.tcl
The nam editor if defined in your .tcl script will now open.
3.2.Install a precompiled copy on Windows
Install ns2 on a Windows Platform
Download Tcl830.exe from
http://cet-netres-srv.sunderland.ac.uk/website/Network-Simulation/ns2-win/
or
http://sourceforge.net/project/showfiles.php?group_id=10894
Download nam-1.0a11a-win32.exe
http://www.isi.edu/nsnam/dist/binary/
or
http://www.isi.edu/nsnam/nam/index.html
Download ns-2.1b9a-win32.exe
http://www.isi.edu/nsnam/dist/binary/
A good site for installation is:
http://www.isi.edu/nsnam/ns/ns-win32-build.html
Next Install Tcl a set of instructions are contained at Appendix B.
Create a folder in the root of c: called ns then copy the nam-1.0a11a-win32.exe and ns-2.1b9a-win32.exe files to this location.
Rename the ns-2.1b9a-win32.exe to ns2.exe.
Rename the nam-1.0a11a-win32.exe to nam.exe
Place the .tcl files in the c:\ns folder. Open a Command Window (DOS)
Change directory to c:\ns. Run tcl using
tclsh83.exe
To observe the simulation at the command prompt type:
ns2.exe yourscriptname.tcl
Alternatively you can run the Windows version of Tcl by typing:
wish83.exe
3.3. Install Ns2 on Linux
Download ns-allinone-2.26.tar.gz from;
http://www.isi.edu/nsnam/dist/
Save in usr/local and then untar. Open a terminal window and type:
tar xzvf ns-allinone.tar.gz
cd ns-allinone-2.26
Install ns
./install
Set environment variables by editing etc/profile and put in
export NS_HOME=/usr/local/ns-allinone-2.26/
export PATH=$NS_HOME/tcl8.3.2/unix:$NS_HOME/tk8.3.2/unix:$NS_HOME/bin:$PATH
export LD_LIBRARY_PATH=$NS_HOME/tcl8.3.2/unix:$NS_HOME/tk8.3.2/unix:\
$NS_HOME/otcl-1.0a8:$NS_HOME/lib:$LD_LIBRARY_PATH
export TCL_LIBRARY=$NS_HOME/tcl8.3.2/library
Complete the optional validation test. Note this may take some time.
cd ns-allinone-2.26
cd ns-2.26; ./validate
Place Tcl script in your home folder then to observe the simulation open up a terminal window and type
ns example.tcl
3.4. How to work in the CDE environment
On the terraces are the Solaris Pc’s. Before attempting to logon select options/session/Common Desktop environment (CDE), continue entering your username and password to logon to the University of Sunderland (UoS) system.
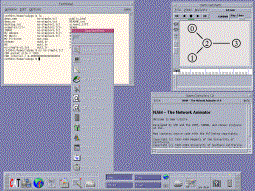
[ Fig-3 CDE Enviroment.]
Along the bottom of the screen is the main toolbar, which contains menus. In order to run Ns we need to open up a terminal window this is contained in the application menu. Should you select the wrong menu simply close it by pressing Alt F4 or clicking the top left hand corner of the menu window and select the close option, this is the same for all windows in CDE.
In the files menu is your home folder this is your University H drive all Tcl script files need to be stored in the root of this folder. To edit a Tcl file simply right click on the file and choose open, the file will open in a text editor. The other option is to select a text editor from the menu to open the file. Once you have your script files in your H drive and a terminal window open at the prompt type:
ns yourscriptname.tcl
This will then run the script and show the animation in nam. From the CAT applications menu there are direct links to ns and nam. We discuss manipulating data files in nam later. No more is needed to run ns in the CDE enviroment. To log out select exit from the main toolbar or alternatively click on the top left hand corner and choose exit.
3.5. How to run the editor and manipulate data files
Nam can be invoked by typing nam at the terminal window prompt or from the appropriate directory in windows (in windows you will need to type nam.exe), which will allow you to create a simulation graphically by adding the elements to the window. Once this is saved it automatically generates a .ns and .nam data file with the name you choose to save the file as.
Any changes made within the nam editor will automatically be saved in the ns data file alternatively you use your favourite text editor to edit the file. The ns file is the .tcl file but with an ns extension. Nodes are added and linked, as are agents. If you right click on an object you can change certain properties. On the file menu is the option to run ns, which will generate the nam output file and show the animation window allowing you to run the animation. The ns file can be reopened and modified at any time using the editor.
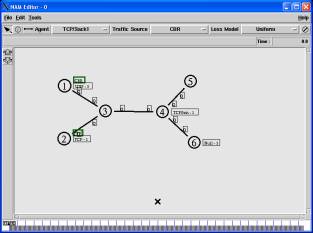
[ Fig-4 nam editor]